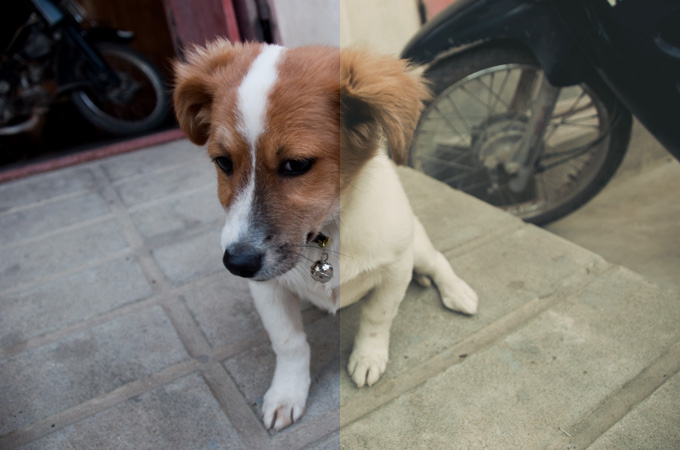
How to create vintage retro effect in Photoshop

I used to do vintage alike photos with Photoshop. Some of my friends asked me how to do it. It wasn’t hard as you think but it is really depends on the color, contrast and tone involved in your photos.

I’m going to show you few steps that make your photos vintage retro alike using Photoshop.

Step 1

Open the photo in Photoshop. Here I used my puppy photo.

Step 2

In Layer Windows, click ‘Create new fill or adjustment layer’ and select ‘Curves’. (Press f7 if you don’t see Layer Windows)

Step 3

You just have created Curve layer, click ‘Curves 1’. In Adjustment Windows, select ‘Red’ Channel. and adjust the Red curve like below.

Step 4

Select ‘Green’ and apply the same thing.

Step 5

Select ‘Blue’ and adjust the curve too.

Step 6

Now go back to Layer Windows, and click ‘Create fill or adjustment layer’. This time, choose ‘Hue/Situation’.

Step 7

In Adjustment Windows, follow the numbers that i show below. Tick the Colorize check box. In Layer Windows, adjust the opacity level of the Hue/Situation layer you have just created.

Step 8

May be you can stop right here. But I want to go a little bit further than this stage. Now I’m going to create the Gredient Map. Click the ‘Create fill or adjustment layer’ and select ‘Gradient Map’ this time.

Step 9

In Adjustment Windows, try to find the pastel color tones. By default, pastel tones are not loaded in Gradient Map. Try clicking ‘>’ arrow icon and select Pastels. Select the pastel color that I choose here and in layers Windows, adjust the opacity of the Gradient Map layer. I set it 10% for this photo.

Now look at the changes before and after editing.

Before

After

If you have any questions or better suggestion leave the comment in this post.

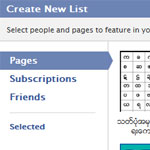
How to create a new interests List in Facebook

Facebook just added a new feature called “Interests” lately. Interests is a list that shows the updates from the collection of pages, friends, and subscriptions. To create a new list, just head to Interest Lists https://www.facebook.com/addlist and click “+ Create list”. Facebook will show the pop up that includes your friends, pages and subscriptions or you can add the public Interest Lists. Facebook also allows you to set privacy level (public, friends, only me) of each List you have created.

facebook-interests-create-new-list

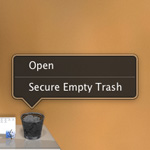
How to delete files permanently in Mac OSX

Secure Empty Trash Deleting files will go to Trash in Mac OS and you click Empty Trash to delete the files completely. For some reason, these files and data can be recovered from some utilities.

If you really want to delete the files permanently, just use the “secure empty trash”. To use “secure empty trash”, right click on Trash (if you enabled, right-click) or Click and hold on Trash icon, it will pop up the menu. Press Command key, then you’ll see “Secure Empty Trash” instead of regular “Empty Trash” menu.

Clicking on “Secure Empty Trash” will bring another dialog which will ask you whether you want to delete the data or not because it will completely erase the deleted files and will be gone forever.

secure-empty-trash-dialog